Thursday, February 9, 2012

Science Fun


Corn Starch Goop


Okay, this one's not science.  But, what is cuter than Clifford, a soldier, and little sis helping with chores?

Wednesday, February 8, 2012

Life of Fred- How's It Working For Us?

I bought 4 of the 10 new Life of Fred elementary math books a while back.  My 7yo reader, does NOT enjoy any of the math programs we've used, and LoF is different.  The student reads a short chapter and then answers just a few questions (called "Your Turn to Play").  I can't really explain the approach, he does a good job of that in his website. 

Instead of dreading DREADING math lessons everyday, my son races to do them.  The books are written as a continual story about a boy professor named Fred.  My son loves stories- perfect match.  Well, because LoF is so different than any other math program I've seen, I am quick to think it will not be adequate.  The author claims that it is NOT a supplement, but a stand alone curriculum. 

In my doubts, and because 7yo was almost done with the 4th book, I was looking at a website of another math program that may be an option later, to see if 7yo could handle it yet.  As I was searching, he came up and said, "You're NOT thinking of getting a different math curriculum, are you?!?" 

I decided to go ahead and get the final 6 elementary books from LoF and not be too hasty to judge.  The author suggests to finish all the elementary books, take a 6 month break and go through them again if the child is not yet ready for the upper math books.  SINCE my son enjoys these so much, I am willing to be a guinea pig and see if he ends up being a math genius.  What I can tell you is that I never imagined this child saying such wonderful things about math, and begging to do more!  The author recommends doing one (short) chapter a day...I haven't been keeping that limit.  But I can see that it may be a good idea so information can sink in before moving to the next chapter.

Just thought I'd throw out this little curriculum review for a new elementary math program (the upper levels are not new, though) written by a math professor.  Be warned, it will NOT be what you think math "should" be.  When we are finished with all ten books (twice) I will try to spread the word as to whether this is a s successful as I had hoped.  It shouldn't take us 6 moths to finish the first round.  Its my attempt to not pull teeth to get math done.

FYI, this is a self-learning curriculum, there is no teaching needed.  DID YOU HEAR THAT?  You do not need to be good at math to use this!  The student just has to read well.  I don't mean you shouldn't get involved or think of interesting ways to review the topics.  I like to read the books first, so I can help direct the few questions he has, and try to enforce the areas covered.  You are not supposed to give the answers, but to encourage them to look back to find it...and they really feel good when they've found it.

P.S. They (I) learn way more than math in these books. 
P.P.S They are very silly, but fit for all ages.

Thursday, January 12, 2012

Homemade Laundry Stain Remover


We mostly use homemade laundry detergent, vinegar, and no dryer sheets to avoid dangerous chemicals in our laundry.  During my times of investigating if the expensive detergents worked better than the homemade soap, I found the only thing to mattered was whether stains were treated with stain remover or not.  So, my stain remover, I have kept...until now!

I thought I was going to have to use ammonia or some other harsh ingredients due to all the stain remover recipes I had found.  Somewhere, I came across this suggestion.  Oh, and how simple it is!  Why...do I not think of these things on my own? 

What you'll need:
1 bar of soap (I chose a plain white natural homemade bar) 
water -2-5quarts depending on your preference

What to do:
1. Grate the soap.
2. Put it in a pan along with the water.  If you're not sure how much, start with 2 quarts.  You can dilute it more later.  I recommend going ahead and using 4 quarts 'cause uts going to be thick.
3. Heat up the mixture until all the soap is melted.
4.  After it has cooled a bit, pour it into the container of your choice.

In a day, this will be a gel (a very thick gel if you use 2 quarts of water).  Use it like it is, or dilute it more.


Here, on the right is the stain remover before I diluted it.  You can see that, after a few second, the middle is oozing down to the lid.  On the left, the gel has been diluted more and it flopped down to the bottom as soon as I turned in upside down.  Its still thick, but squirtable. 

I will dilute the jar on the right when I need to.  That means I will have made over 4 quarts of stain remover for the price of a bar of soap.  AND- we'll avoid the cancer causing ingredients in store bought stain removers! The measley spray bottle of stain remover I've been using costs more and it only has 30 ounces in it.  Compare that to over 128 ounces for less money.

Does it work, though?  It has been working for me.  I squirt some on the stain, smear it around or scrub it with a brush.  I will let you know if, in the long run, it turns out to be dissapointing.  So far, I've had great results.

Another thing to make from scratch!
Update:  Our son's nose bled on his pillow one night.  (He has frequent nosebleeds depending on the weather and his health.)  We meant to soak it right away, but we were in a hurry and forgot.  The blood had set for two day on the pillow- we finally covered the spot with this homemade stain remover.  After a few hours, rinsed it off with water and the blood rinsed right off!  TOTALLY!    We have cleaned many spots of blood with zero results- now we have a winner!

Thursday, January 5, 2012

Easy Sewing Projects

If I'm going to do a sewing project, it better be pretty simple.  For Christmas presents, I took the opportunity to learn to sew a few new things.  If you need any gift ideas, I have some.  I learned most of them by doing quick internet searches.


Fleece scarves.  There are many variations- including "no sew" fringe scarves I was planning on making.  I decided to do something different, though, because I could only get plain, single color fleece.  I got some applique pattern ideas and learned about reverse applique (where you sew a shape in two layers of fabric, then cut the top layer away just inside the seem.)

I also learned about the fringe "boa" scarves that only involve one seem- they are the pink, white and gray scarves in the picture.


These baby aprons/bibs were really fun to make.  And very easy.  I learned how at this link. I never knew bias tape was so neat.


I also used bias tape making this apron.  I searched a bunch of apron tutorials 'til I finally just combined a few ideas and winged it.  I like the wide ribbon for ties.


I also stumbled upon the idea of decorating a Sonic drink holder as a gift box.  I don't eat there much, but the children and I happend to have lunch there one day- and I remembered this idea, so I ordered 4 waters in a drink carrier!  It also made me wonder what other kinds of boxes would look neat covered with pretty paper. 


I needed some good ideas for the unfilled slots in the "gift" carrier, so I found a Cowboy Cookies in a Jar recipe as well as a Cranberry Hootycreeks Cookies in a Jar recipe.  I don't know if people really like cookies in a jar recipes, or if it is still just as much work to make the cookies.  What do you think?  Anyway, they look pretty.


The pillow didn't turn out exactly as I had planned (I think I was crossing that line between easy and slighty difficult with this project.)  Maybe it was because I wasn't following any pattern or tutorial- but it ended up alright.  I got to use my kanzashi flowers.  My mom liked it, I made it to match her living room- thanks for the vote of confidence Mom.


Finally, this bag (A-line purse) took a surprisingly short amount of time to make considering I've never made a bag before AND I didn't quite understand the instructions at first.  I learned how to make it here. If you're like me, you may have to triple review the tutorial for some details, but if you know anything about sewing, you'll probably get it right away. 

Who knows if I'll be doing any new crafts until Christmas!  It sure was a good excuse to do some! I would do any of these projects again (except, for the pillow, I would start with a better plan, first.) I hope you get some good ideas for special occasions- or next Christmas.

Wednesday, December 21, 2011

Homemade Lotion- Really More of a Cream

I have tried it all when it comes to store bought facial lotions and creams. I guess my skin is just a bit too sensitive for them. Some natural oils I have used that worked well are jojoba oil, extra virgin olive oil (EVOO), and coconut oil. Since they're oils, they are oily, but it will eventually soak into your skin. Jojoba tends to be the least oily. It is said to be the most like our natural oils. It's also more expensive, but a little goes a long way. My mom once bought me a small jar of (EVOO) sold just for that purpose from a company in Japan. That is how I was introduced to using natural oils as moisturizers. I don't suppose it has to be an expensive EVOO to be effective.

More than I like using those oils for my skin, I like using homemade lotion. It is all natural, keeping it in the fridge will help it last longer. I keep a small container of it in the bathroom and it lasts just fine for me. The very best time to apply it is after a shower when your skin is extra thirsty and it soaks right in.

I wouldn't say it is difficult, but it is the most finicky of the homemade products I make. It also makes a mess in the blender. I am in need of more, so here we go:

You need-  1 Cup of oil(infuse it, if you like)
                   1 oz beeswax
                   6 T water (sterilized. You can also infuse the water with skin nourishing herbs.  Add the herbs and water in a pot.  Heat on low until you smell and herby smell and the water looks like a light tea:)

This time I chose to use these ingredients.
Almond oil, grapeseed oil, jojoba oil, and beeswax (water, too).

1. Melt the beeswax in a double broiler.  As I've mentioned before, keep it off the burner and don't splash it around.  It's flammable and it sticks like glue until the oils are mixed in.

2.  Add 1 Cup of the oils of your choosing.  I chose oils that tend to be less greasy.  Mine were also infused with calendula petals and lavender flowers- both of which are good for the skin and for healing.  Chickweed would also be a good herbs  for that.  Anyway, the beeswax will harden back up a little, but it won't take long to remelt.

3. Next, your going to pour the melted oil/beeswax into the blender.  You may want to let it cool a little first, if you think it will crack the blender.

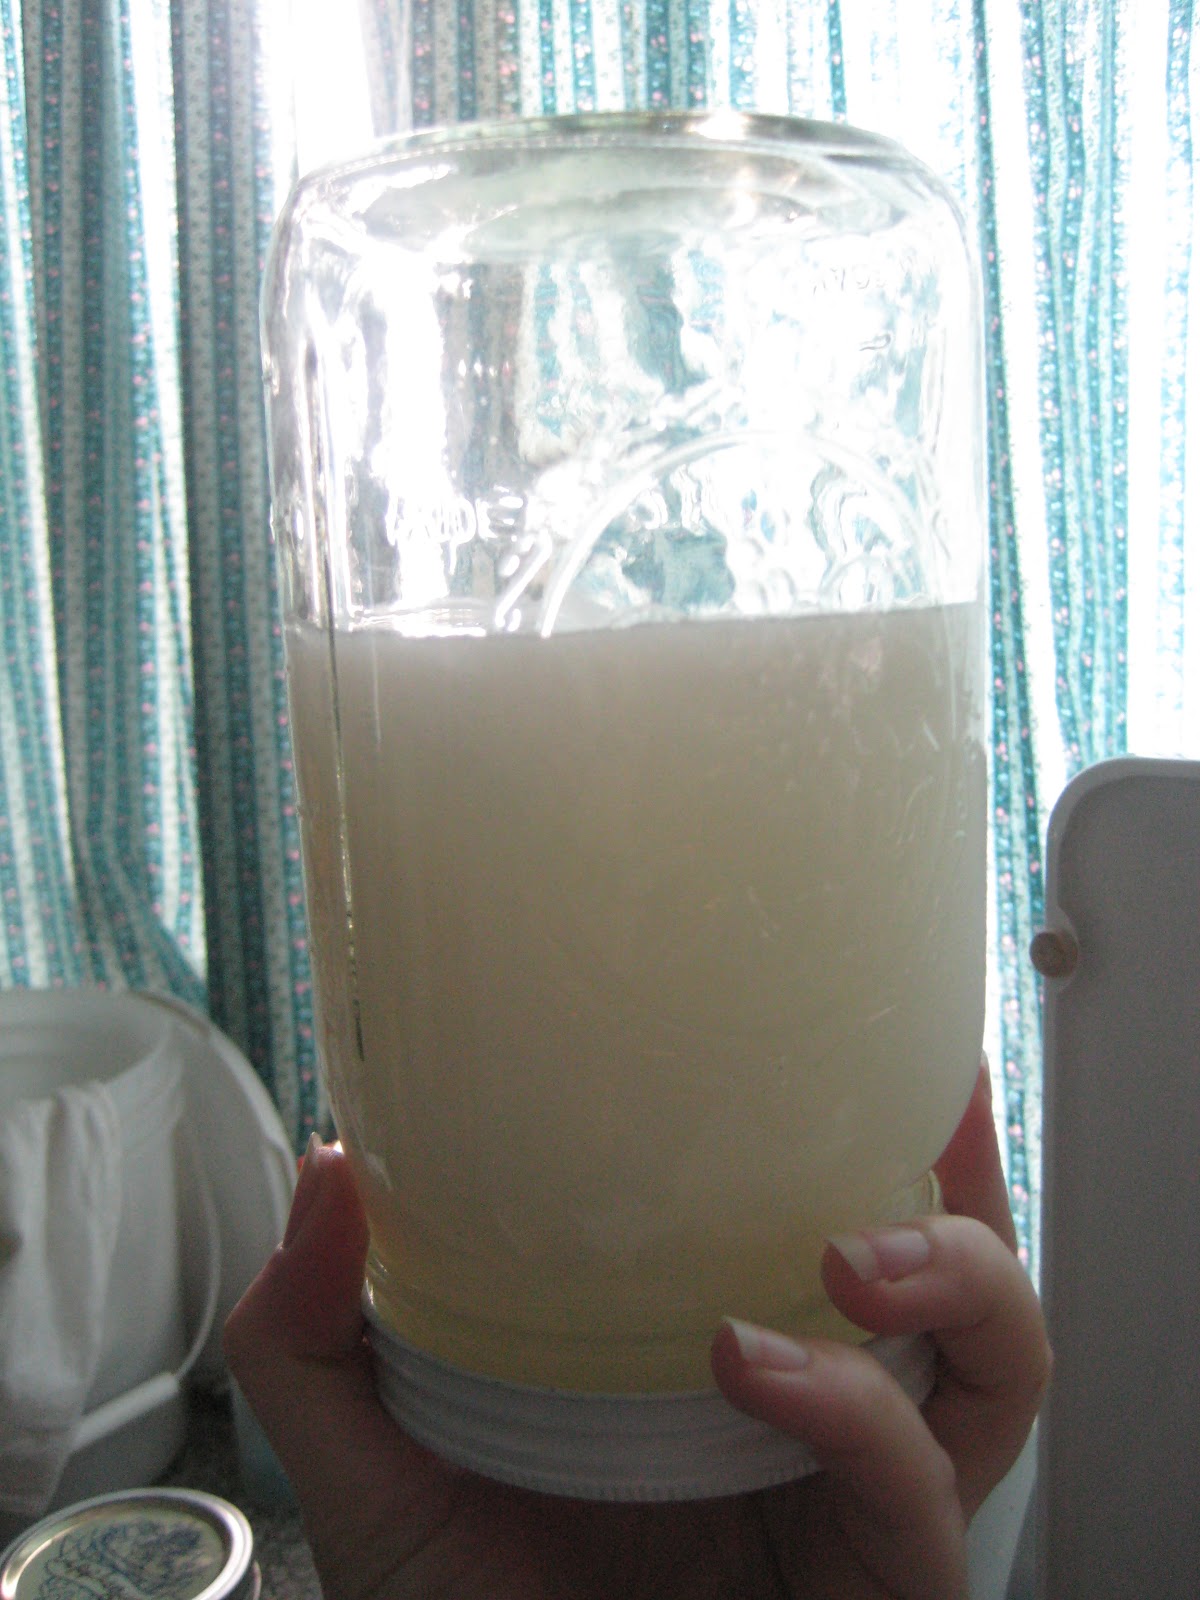
4. While the blender is blending on low, slowly, SLOWLY, very slowly add 6T of sterilized water.  Why slowly and while the blender is on?  You are trying to emulsify the water and oils with out having to buy an emulsifying agent, which would make your natural cream- unnatural.  Since water and oils don't mix, you have to trick them into doing it anyway...slowly.  This may wreak havoc on your blender.  They say you should use a REALLY good blender for this.  My old one seems to do the trick, and if it breaks down, I won't be sad while buying another Bosch blender attachment.


5. After you blend past the point you think you need to, pour the cream (it should still be a little liquidy) into your containers or a jar.  Scrape out all the extra, it is good stuff!

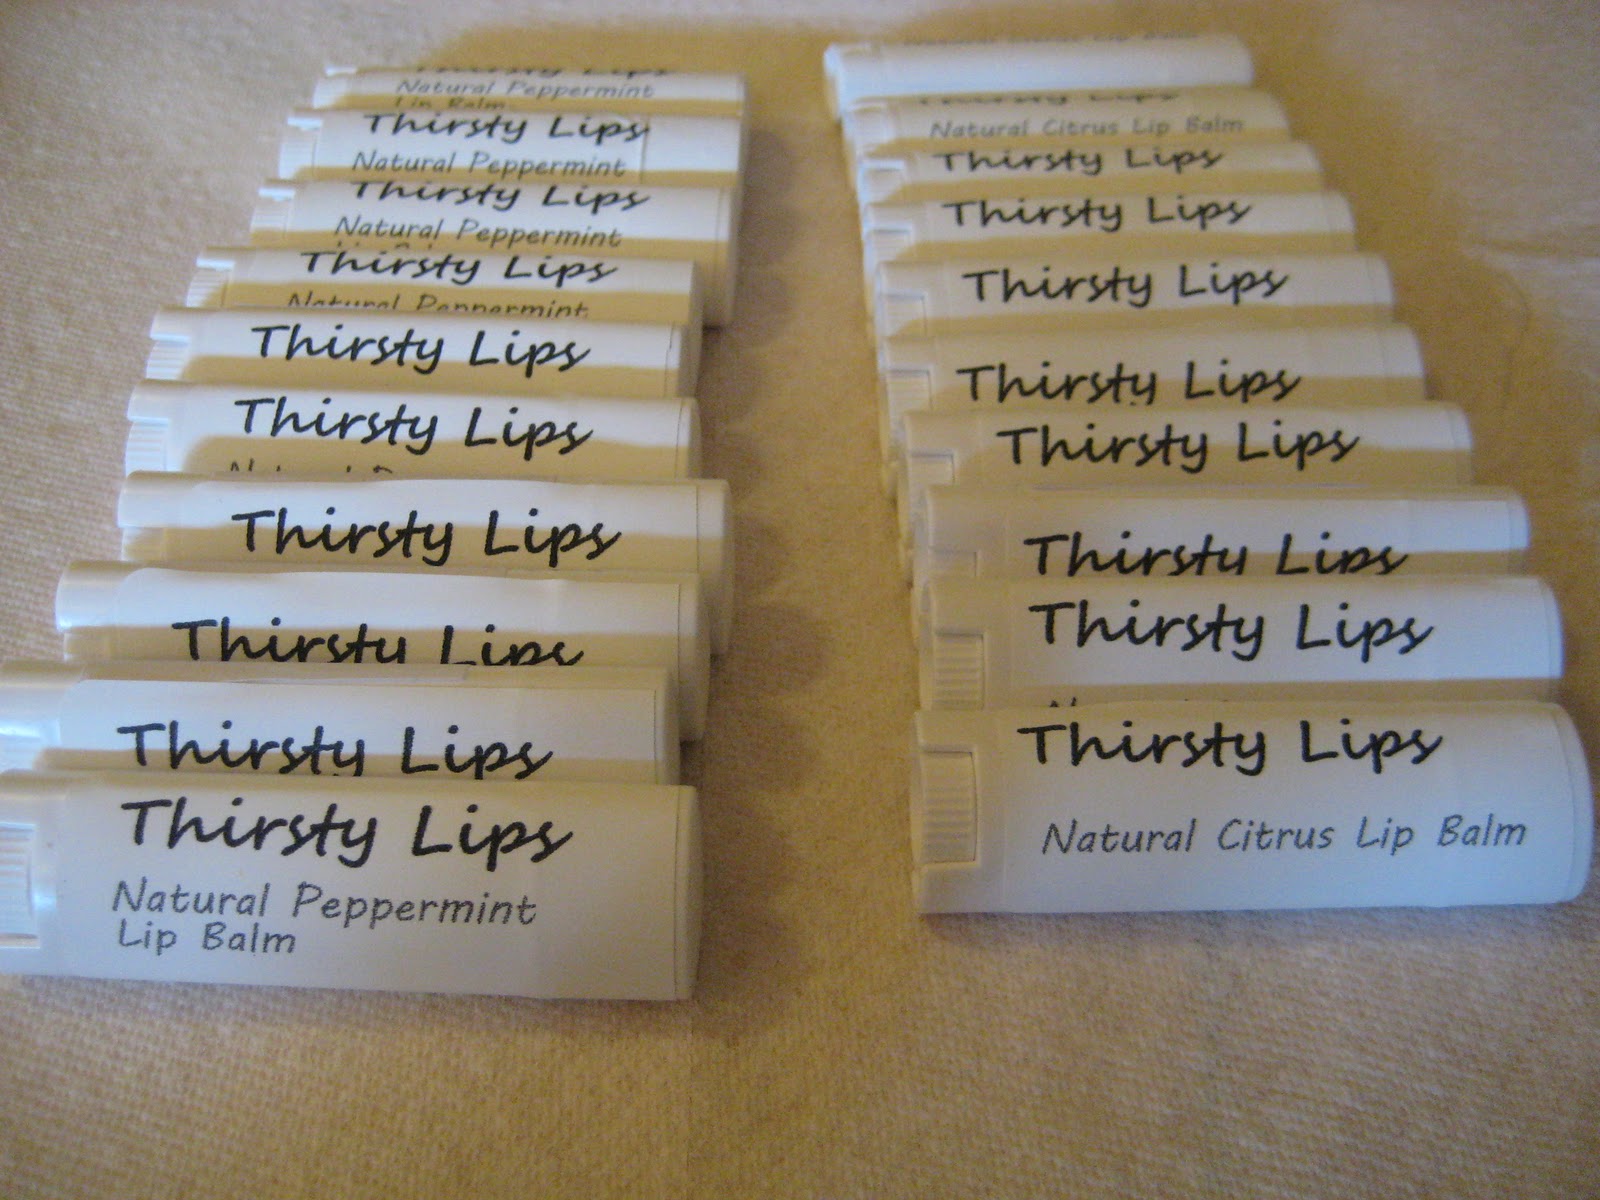
The tins are 1 oz size to give you an idea of how much I ended up with.

Cleanup is no fun, but at least there are not very many dishes.

Cons to making homemade cream:
Since there are no preservatives, mold can grow.  I've not had it happen, but I gave some to my sister that did grow mold. 
It can be greasy if you're used to commercial lotions.
Tins can rust since there is water in the lotion. (just at the rim where the lid and bottom join)
It can melt in high heat.
It does not  always consistantly turn out the same.

Having stated the disclaimers, I do not ever plan on going back.  I love it.  It is better for sensitive skin than anything I have tried (Not just for the face, but hands and everything.)

Alternatives:
I've made lotion/cream with aloe vera gel, vit. E oil, and vit.A, as well as other fancy things.  The simple as always resulted in the best lotion for me, FYI.


Don't forget the lables.


p.s. Hopefully, I will soon post about lotion bars, which are the best thing to use for feet, elbows, and other extra dry parts AND super easy to make.


Tuesday, December 20, 2011

Christmas Decorations


I thought this was a very idea my boys had, to transform a bar of handmade soap into an ornament.  Somehow they made it look nice- and they were proud of it.

Friday, December 16, 2011

Homemade Vanilla Extract-YES there is a difference.

WOW


I was making hot cocoa last night for the family while we were getting ready to listen to the audio version of "Treasures in the Snow" by Patricia St. John. (Excellent story BTW- my husband does not recommend the video version.  He says it was so boring, he couldn't get through it.  Sorry if that hurts anyone's feelings.)  On the other hand, we have listened to our Christian radio station's audio version for 3 years now. 

Anyway, I was making the cocoa and remembered the vanilla extract I had made...about a year ago.  I have tried to use it before now, but I could NOT get the lid unscrewed for anything.  I decided to pull it out and try again.  Somehow, it opened and I took a tiny taste.  Wow. The vanilla flavor is so good!  I then took a tiny taste of the store vanilla- which is very expensive- and it tasted like grossness in comparison.  I thought it was in my head so I called the husband over to try.  He agreed.  So did the boys, but they had just seen our reactions, so they were a little swayed already.

It is so easy to make, too!  Do you want to try?

You need:
vanilla beans- 3 or more
vodka (or rum)- to fill the jar
jar and lid

1. Cut open each bean length wise to expose the inside and seeds but leave it uncut at one end.
2. Put the beans in a jar and cover with vodka.  Here, I am just capping off what I have left in the jar, so it is already dark.  When you first do it, it will take time to turn dark.

3. Let sit in a dark place for 2 or more months. Shake every once in a while.

4. Guess what, you get to reuse the beans!  Just keep adding more vodka.

I am adding rum this time.  I bought some when I was trying out a recipe for aftershave...which I don't think I will post about...so, since that's what I have, that's what I'll try.  Does anyone know if it will taste okay?  Well, happy vanilla extract making!

Thursday, December 15, 2011

Homemade Lip Balm!

Make your own Lip Balm.
All natural lip balm is easy to make.  On the left, you can see what I generally use to make it ( forgot the beeswax in that picture, though).  The picture on the right is basically all you NEED to make it.


 Here is a simple recipe:

1 ounce beeswax (order it or refine it from honeycomb).
1/2 Cup oil (use one kind or a variety- olive, coconut,
sweet almond, jojoba, shea butter, grape seed, etc.)

The rest is optional:
1/4 teaspoon aloe vera
1/2 teaspoon vitamin E
1/2 teaspoon essential oil

Makes about 5 ounces.

Here is the How-To:

1. Melt the beeswax in a double boiler.  I use a glass measuring cup on top of a canning ring inside a pan.  Don't get the melted beeswax all over the place.  It is a bear to clean off, but once we melt the oils with it, the wax loses its bonding ( superpower glue like) ability.


2. Once the wax is all melted, Add the 1/2 oil.  The coolness of the oil will make the beeswax cool enough to harden in places.  It won't take long for it to remelt.


3. Take the mixture off of the heat.  This is when you add the optional 1/4t aloe vera gel and 1/2t vit E oil.  Its also time to add 1/2t essential oil of your liking.  Work quickly, the balm will harden as it cools.


4. This is not a very good picture because I am working quickly.  I am piping the balm into tubes.  You can pour it in.  This is the first time I've used a piper thingy, it is less messy.  The tops of the lip balm will sink as they cool in the tubes, that's just the way it is.  Add a few more drops to the tube than you'll think necessary and it may not do that.

You certainly don't have to use tubes.  Whatever you have in hand is fine. 

This is the end result.  I would have had a few more tubes or tins if I wanted to remelt the balm that cooled before I could pour it.  I just put it in a jar for our family to use.


Don't forget the labels- clean the outside of the tubes off with rubbing alcohol to remove and oils so the labels will stick.
Caution: These can melt in hot weather or in the clothes dryer.


Wednesday, December 14, 2011

Homemade Spray Cleaners and Powder Laundry Soap

 Quick and Easy AND Cheap

I used to use vinegar and water for my general spray cleaning needs, which works pretty good.  But we have 4 children...and I needed a little more power.  My sister told me about her homemade spray cleaner and this website http://gnowfglins.com/2011/05/25/free-video-homemade-all-purpose-cleaner/. (There's a lot of very interesting info on her site if you wanna check it out.) I have been making it for a while now.  Its really been working well for us.  My current version is not all natural, but it could be with more effort. Here is the recipe (of course, you can tweak it):

Homemade Spray Cleaner: (measurements are approximate)

*3T rubbing alcohol
*Vinegar-just pour some in (optional: not in the original recipe)
*30 drops/1 teaspoon essential oils (lemon, tea tree, pine needle, ylang ylang, or a mixture pleasing to your snout).  Don't feel like you have to go buy essential oils for this, its not critical to the effectiveness of the cleaner.
*A little grapefruit seed extract is know to kill germs, but has no smell (optional: not in original recipe)
*3T liquid soap (I've been using store bought dish soap SO I only use 1T, but castille liquid soap would be healthier and you may need more like 3T.)
*Water

Pour the first 4 ingredients into a tall spray bottle.  Fill the bottle over half full with water.  Add the liquid soap and shake it up a little.  Last, add the more water to the top.  I do it like this to avoid massive amounts of suds in the bottle that would happen if I added the soap in before pouring in any water.  But it doesn't really have any rules.   Shake before each use, essential oils want to float.

I like to make a gallon refill amount to make life go more smoothly.  Shake gallon container before refilling the spray bottle.

Window cleaner
This is not a secret by any means, but since I'm on the subject of cleaners, I thought I'd add a couple more.  For windows and mirrors (and whatever else I think needs it) I use half rubbing alcohol and half water.  No expensive Windex full of chemicals.

Pot scrubber cleaner
Again, not going to blow your mind- although it did mine when I first tried it.  When I scrub my scrambled egg pan and other stainless steel pots, I sprinkle on some baking soda, squirt a dab of dish soap and easily scrub off the mess!  Love it.  I fill empty shaker bottles with baking soda and keep one in the kitchen, and one in each bathroom to clean out the sinks.

Powder Laundry Soap
I posted before about homemade liquid laundry soap, but I guess I forgot to post about the powdered version.  I need some for laundry today, so why not post it?  It is quicker to make than liquid, and doesn't take up as much space, but I am thinking the liquid laundry soap lasts for more loads.  What do you think?

Here goes:

Ingredients:
*1 Bar of soap (any kind you wish except soap with lotion added-or so I hear.  I use my homemade soap.  This time, I gave eucalyptus a try.  It's supposed to keep spiders and ticks away. Fels Naptha is all the buzz for homemade laundry soap makers, I don't prefer it, though.  Go with your preferences.)
*1 Cup Washing Soda
*1 Cup Borax


Grate the soap.  Use a fine grater if possible.  But non-fine is fine, too.


Mix in the washing soda and borax.  Tell your children, contrary to their beliefs, you are not mixing grated cheese and sugar- borax is dangerous to ingest and soap is just plain nasty.


Extra step (which I find worthwhile)- blend the mixture in a food processor.  This tiny thing was already out so I used it, but using a big one would get the job down in a blink.  Wow!  It made the soap much finer, which made the ingredients blend better.


Extra Step (which I have never tried, so I don't know if its worth it)- add few drops of essential oils for scent.  My hypothesis is that the smell wouldn't last or be strong enough to notice, so why waste the pricey essential oils?  Anybody tried it?

Now, pour it into your container and label it. Keep it our of reach of small children since it has Borax in it.


2 Tablespoons per load should do it.  There won't be suds, but don't be deceived, suds aren't really what cleans things, they just make us feel better because we're used to them.  I hear this can be used in HE washers, too.  Easy. Done.

Feel free to share any cleaner recipes!  I love to learn new things.  

Wednesday, November 30, 2011

Growing

Oh, I'm not so good at posting often.  Here are some of the milestones around here. 

5yo rode his bike without training wheels the FIRST try!  It has been 2 months since then.  We have been on many bike rides and he just takes off (with a crash here and there.)  We were all clapping for him, including his 1 year old sister- it was actually her birthday that day.


3yo loves to be helpful, as usual.  He likes to be a part of chores, especially when Daddy is working on something.  (Here, he is not being so helpful.)

7yo has lost his first two teeth.  I didn't realize what a life-changing event this is for a young person.  He talked about it constantly and wanted to show everyone.  He realized he went through a change and would never be the same again.  I think he looks cute. 

We're getting ready for Christmas around here.  I like to make a few homemade gifts when I can think of something fun.  That's what we'll be doing!   Its probably more fun to make the gifts than to be the one to receive them. So, I'll be doing a little shopping, as well.